
Fondant Rose Tutorial (Easy)


This is a tutorial on how to make rose flowers. As the heading implies, this is an easy rose flower which means it does not make use of a lot of fancy petal forming tools. The results are however impressive.


TOOLS:
(1) Rose Petal Cutter
(2) Rolling Pin
(3) A Plastic Bowl with Cover (See Note 1)
(4) Paint Brushes
(5) Flower Molds (See Note 2)
(6) Floral Wire (Optional)
(7) Elevated Cake Cooling Racks (Optional)
(8) Electric Kettle (See Note 3)
(9) Toothpicks

EDIBLE COMPONENTS:
(1) Fondant. I use Marshmallow Fondant. Recipe here
(2) Food Color Paste
(3) Pearl/Petal Dust
(4) Water
NOTES:
(1) The purpose of the plastic bowl is to store the petal cutouts so they don’t get dry while you work.
(2) In place of flower molds you can use empty egg crates like I have done here.
(3) The purpose of the electric kettle is to steam the flowers. A hand steamer can be used instead. You can also steam the flowers by holding them over a pot of boiling water.

PROCEDURE:
(1) Color the fondant the color of your choice and shape several cones. These cones will form the hearts of the flowers. Use the petal cutter as a guide for how large the cones should be. The cones should be able to fit into one of the petals of the cutter. These cones will be covered entirely by petals so do not fuss over making them very smooth. As can be seen in the pictures below, I made the cones using white fondant even though I was making blue roses.

(2) Leave the cones to dry for about 30 minutes or for as long as you can afford to do so. You want them to be somewhat stiff. Note however that if you intend to use floral wires on your flowers, you do not want the cones to dry for long before using them.

(3) Roll your fondant out to be as thin as possible and cut out petals using the petal cutter. We will not be making use of ball rolling tools here so be sure to roll out your fondant very thin. Keep the petal cutouts sealed in your plastic bowl after each cut so they do not dry out. Keeping your petals sealed is very important as they will crack during formation if they are dry. You will be using 3-4 petal cutouts per flower. Take this number into consideration when cutting out the petals.

(4) Rose formation. You have a choice here of working on one flower at a time or on several flowers at the same time. I prefer to work with several flowers at the same time. The first step is to place a petal cutout on your work surface making sure that the underside of the petals is now the top. Brush a little bit of water on all the petals and place a flower heart in the middle of the petals.

(5) Now, wrap the petals tightly all around the flower heart. This is to be done in a certain order. I have numbered the petals in the picture below to show you the order in which they should be wrapped. You can do this first step for all your flower hearts.


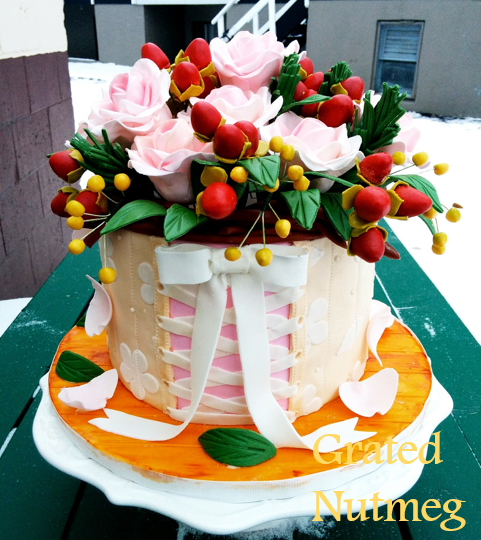
Note: You can stop at this stage if all you want to make are rose buds like I did in the Paris Cake below.

(6) Next, working with about 4 petal cutouts at a time, place them on your work surface right side up. Using a toothpick, coil the tip of each petal in two spots around a toothpick to form almost a pointed tip on each petal. Each coil takes about a second to execute. Go round the petal cutouts until all of them have been coiled. Allow each petal to air for about a minute after coiling before using.

(7) Flip the petal cutout and brush them with some water. Place a wrapped flower heart in the middle of each petal cutout and wrap the heart with the petals sequentially with each petal overlapping the one before it. Tuck the last petal underneath the first one. Repeat the above step with the next roll of petals. I used only 2 rolls of petals here but you can use as many rolls as you want to, depending on how large and bulky you want your rose to be.


(8) Place the formed roses in your flower drying mold (or egg crate) and allow them to dry in there. If you intend to put floral wires in the roses, dry them in the mold for about 6 hours before doing so.

(9) If using floral wires, cut them into desired lengths and bend one of the tips to form a hook. This hook is what is going to keep the floral wire in place and prevent it from coming out of the flower.

(10) After about 6 hours, your rose petals should be strong enough to handle with your hands. The heart will however not be very dry as it is made up of a thick mass of fondant. Insert the hooked end of the floral wire into the base of the roses and place the roses on an elevated cooling rack to dry. My racks were not high enough to accommodate the length of the floral wires and so I stacked two racks on each other. If you have store bought flower drying racks, curve the other end of the floral wire and hang the flowers on the drying racks. Allow the flowers to dry this way for at least 24 hours. Preferably 48 hours. If you are not inserting floral wires into your roses, take them out of the molds and leave them to dry on the cooling racks for better exposure to air.

(11) When you are certain that the roses are dry, it is time to brush them with pearl/color dust and steam them. The color dust adds shine and color contrast to the roses while steaming helps the colors to set and make the roses glossy. Brush the interior base of the flower petals with your color/pearl dust. Start from the middle of the flower and work your way outwards, becoming less and less heavy handed with the color as you progress. It is actually possible to make white or light colored roses and turn them into stained roses using pearl/color dust.


(12) After brushing your petals with color, it is time to steam them. Steaming takes about 5 seconds per flower. Do not over steam them or the petals will become soft, lose shape and break/tear. Simply hold your flower upside down over a pot of boiling water or the opening of an electric kettle for about 5 seconds and take them off. Note that what you need here is boiling water and not just hot water. Boiling water is what produces steam. You should immediately notice the glossy look of the flowers. If they do not look glossy, repeat the process for a few seconds more.
(13) Allow the flowers to dry for about an hour and they will be ready for use.

Terry Adido is passionate about showing people how easy it is to recreate restaurant quality meals in the comfort of their kitchens. With a style of cooking he refers to as Afro-European Fusion, his meals are influenced greatly by French and Italian Cuisine with a West African twist. If you love good food, you are in for the ride of your life.
You are the best Terry. Kudos
Thanks.
My God! Ure sooo detailed! Anywais I’m just trying your thaizhong(sp?) Bread recipe. Wish me luck. Lol
Thanks. All the best, you will love that bread.
You re so nice. Thanks 4 d tutorial dearie.
Thanks Grace.
terry u are d best. tanx so much.
Thanks Mariam.
Thanks for sharing…u r amazing!!
Thanks Maris.
Whoop! I’ve searched all over for a SIMPLE rose tutorial and now I’ve found it. Thank u Terry.
I’m glad I could help.
U re d best Terry. I didn’t make any mistake choosing u as my mentor. Pls always carry me along cos I am only but ur baby girl who is ever ready to learn pls.
Thanks Tosin. I’d try to keep you posted.
Wow’ always make the unimaginable simple’ u are a genius’ God bless u.
Thanks Moji.
Wow! I luv dis. Thanks
You are welcome.
Terry, your tutorials are so easy and detailed. Thank you.
You are welcome Jane.
I was looking for a good tutorial on roses and you have made it look so easy. I usually buy faux flowers for my cakes but now I hope to be able to make my own now. Thanks for the help x
I’m glad I could help Tracy. Yes, these roses are quite easy to make.
Now, I will be able to make my own flower.
Thank you Terry.
You are welcome Chinyere.
Wow thank you so much terry.
You are welcome.
thanks so much terry
You are welcome Temmy.
Terry, U re d Boom! Thank you so much for dis tutorial. You have bn helpful. Thanks
Thanks. You are welcome.
Thank you so much for this tutorial,I’ve always wanted to learn this from someone perfect in it and here u are,thanks for this I appreciate.
You are welcome Nuella.
Dis is lvly and great
Thanks Esther.
I can’t overemphasize how u make these things sooooo easy. Thanks, u r blessed
Thanks Ivie.
wow !!! Mr Terry this is so simplified,thanks for your tutorials and recipes,you are an inspiration.God bless you.
You are welcome Laura.
Wow!! This is awesome, u the best terry.I was wondering why the wire didn’t hold on the rose buds,mine were not hooked,thank u so much,again,u the best
You are welcome. Yeah, hooking is the trick.
Bros u too much, God ll keep blessing u for us. He ll impart more knowledge so dat u share to us.
Thanks Ngozi.
Thanks so much terry. Blessed be the day icame across into ur website.Thanks for been a blessing.
Thanks Wumi.
Pls wats the size of the floral wire? Thank you
Any size would do for this.
May God bless you for all I’m learning on your blog. Thank you very much and more grace to you. cheers!
Glad you find my tutorials useful Doo.
Hi, i really need posts by mail because most times I try saving the pages but can’t really lay my hand in them or if I can get them via PDF that would be sent to my email.
Thanks Terry
Hi. I can’t send you posts by mail. You can however subscribe to the blog and get notifications of new recipes as they come up. Don’t worry, these recipes would always be here for you to use.
Thank you Mr. Terry for this wonderful tutorial. please I want to ask if gum paste can be used instead of fondant. Thank you
You are welcome. I would say yes to your question.
Thank you Mr. Terry
You are welcome.
You are fantastic. If you wrote a book, I believe I might actually buy it. 🙂
Actually I know I would buy it..except I’m not even sure it’s possible to put all that genius in a book!!!
🙂
Thanks Krystal.
Tnx Terry u are great. am in Nigeria and fondant can’t hold for flowers during rainy season. what can I do so as to get one that can hold.? tnx
Thanks. I would advice you talking to bakers based in Nigeria. They will be better able to advice you.
Hi Terry if my petal cutters are single pieces of different sizes can i achieve this method as well cos i noticed urs form five petals together and its kind of easy to make the first rose bud
Yes you can, but it would be a lot more difficult. I have those single petals which I use for more elaborate roses.
Hello once again lovely tutorial. please a quick question. do you use the same size of rose petal cutter to cover the heart and the outer petals?
Yes I do.
Really appreciate this tutorial.God bless u real gud
Thanks Tolamise.
Thanks Terry,God bless you!
You are welcome Banke.
Woooh it my first time here and I have learnt a lot thanks a million times for your honest tutorials God bless you. I have bookmark you site so as to learn more.
Glad to have you here Blessing.
You are a blessing. May God reward yiu richly. Amen
Thanks Fola.
Be blessed Terry. The more you share the more you are blessed
Thanks Nguenue.
Thank you very much for this wonderful tutorial…
You are welcome Portia.
Thank u soo much Terry, Ur an embodiment and dispenser of knowledge. More wisdom, Ideas, Blessings and open doors for u I pray, Amen.
Amen. Thanks
You are such a generous person Terry. I haven’t met a more generous person. I’ve observed that some people in this profession in Nigeria feel threatened, for reasons best known to them. They’d rather not share information, no matter how little. But then again, I guess individuals have a right to act however they deem fit, and I’ve come to realize that my “growth” as an individual is my personal responsibility.So i’m aware that no one owes me anything really. I’m very grateful to you Terry for your willingness to give freely of your knowledge and gifts and how much you put into helping others become better. You are in my prayers always. May God bless and keep you always, amen.
Thanks Joy. You are welcome.
Hi Terry. For fondant roses without floral wires, please how do you hold them while steaming, ensuring that the whole length of them are steamed, and at the same time making sure that the roses/flowers are not damaged? Thank you.
Hi Joy, for large roses, I hold them at the bottom over the steam (yes, my fingers suffer for this). I also place flowers in a sieve or strainer and place that over the steam. The steam passes through the holes in the strainer or sieve.
I suggest you wear hand gloves next time to save your fingers!
Thanks Cynthia.
Thanks Terry for sharing your knowledge. I have usually struggled with rose flower… in fact flowers in general. But with your tutorial and marshmallow fondant, I believe ill get it next time.
You are welcome Chioma. I hope you nail them next time you try.
Tanks for the toturial
You are welcome Sussy.
Welldone Terry!
I appreciate your simplicity in explaining things that would have been otherwise, complex!
God bless you real good!
Thanks Cynthia.
I’m so blown away with the level of simplicity on this tutorial. Big ups and thanks for sharing
You are welcome Ify.