
Fondant Bed Frame Tutorial
This is a tutorial on how to make bed frames for bed and cot cakes. These frames are so impressive, they look like real wood. In spite of their intimidating look, they are actually quite easy to make. They however involve a lot of calculation. Thy need to be made about a week in advance to dry properly.
TOOLS:
(1) A Ruler
(2) Pizza Cutter (See Note 1)
(3) Rolling Pin
INGREDIENTS:
(1) Fondant. I use Marshmallow Fondant
(2) Melted White Chocolate (See Note 2)
NOTES:
(1) I prefer to use a pizza cutter to cut my fondant as it gives a clean cut and the fondant does not drag while cutting. You can however make use of a knife, blade or any other fondant cutter you use.
(2) I use melted white chocolate as my gluing agent because it does a great job of gluing fondant pieces together.
PROCEDURE:
(1) Make your fondant and color it as needed. I almost always color my bed frames ivory. Ensure that your fondant is firm. If it is soft, you will not be able to cut straight lines and managing the cutouts will be difficult.
(2) Roll out your fondant. You do not want it to be very thin. About a 4th of a centimeter is ideal.
(3) Now comes the process of measuring and cutting. The size and number of each piece will depend on the size of your cake. For this tutorial, I used the frames for an 11 x 8 x 4.5 inch cake. Below are the measurements I used.
(i) 3 Horizontal Pieces measuring 11 x .5 inches
(ii) 6 Horizontal Pieces measuring 8 x .5 inches
(iii) 30 Vertical Pieces measuring 6 inches x 1 Centimeter.
(4) Cut out pieces and allow them to dry. If possible, cut them on the surface where you intend to dry them. Moving them around might bend the pieces and you want them to be as straight as possible. They can be moved after they have dried for a day or two. To get them dry faster, transfer the pieces to a cooling rack after a day so they dry from both the top and the bottom.
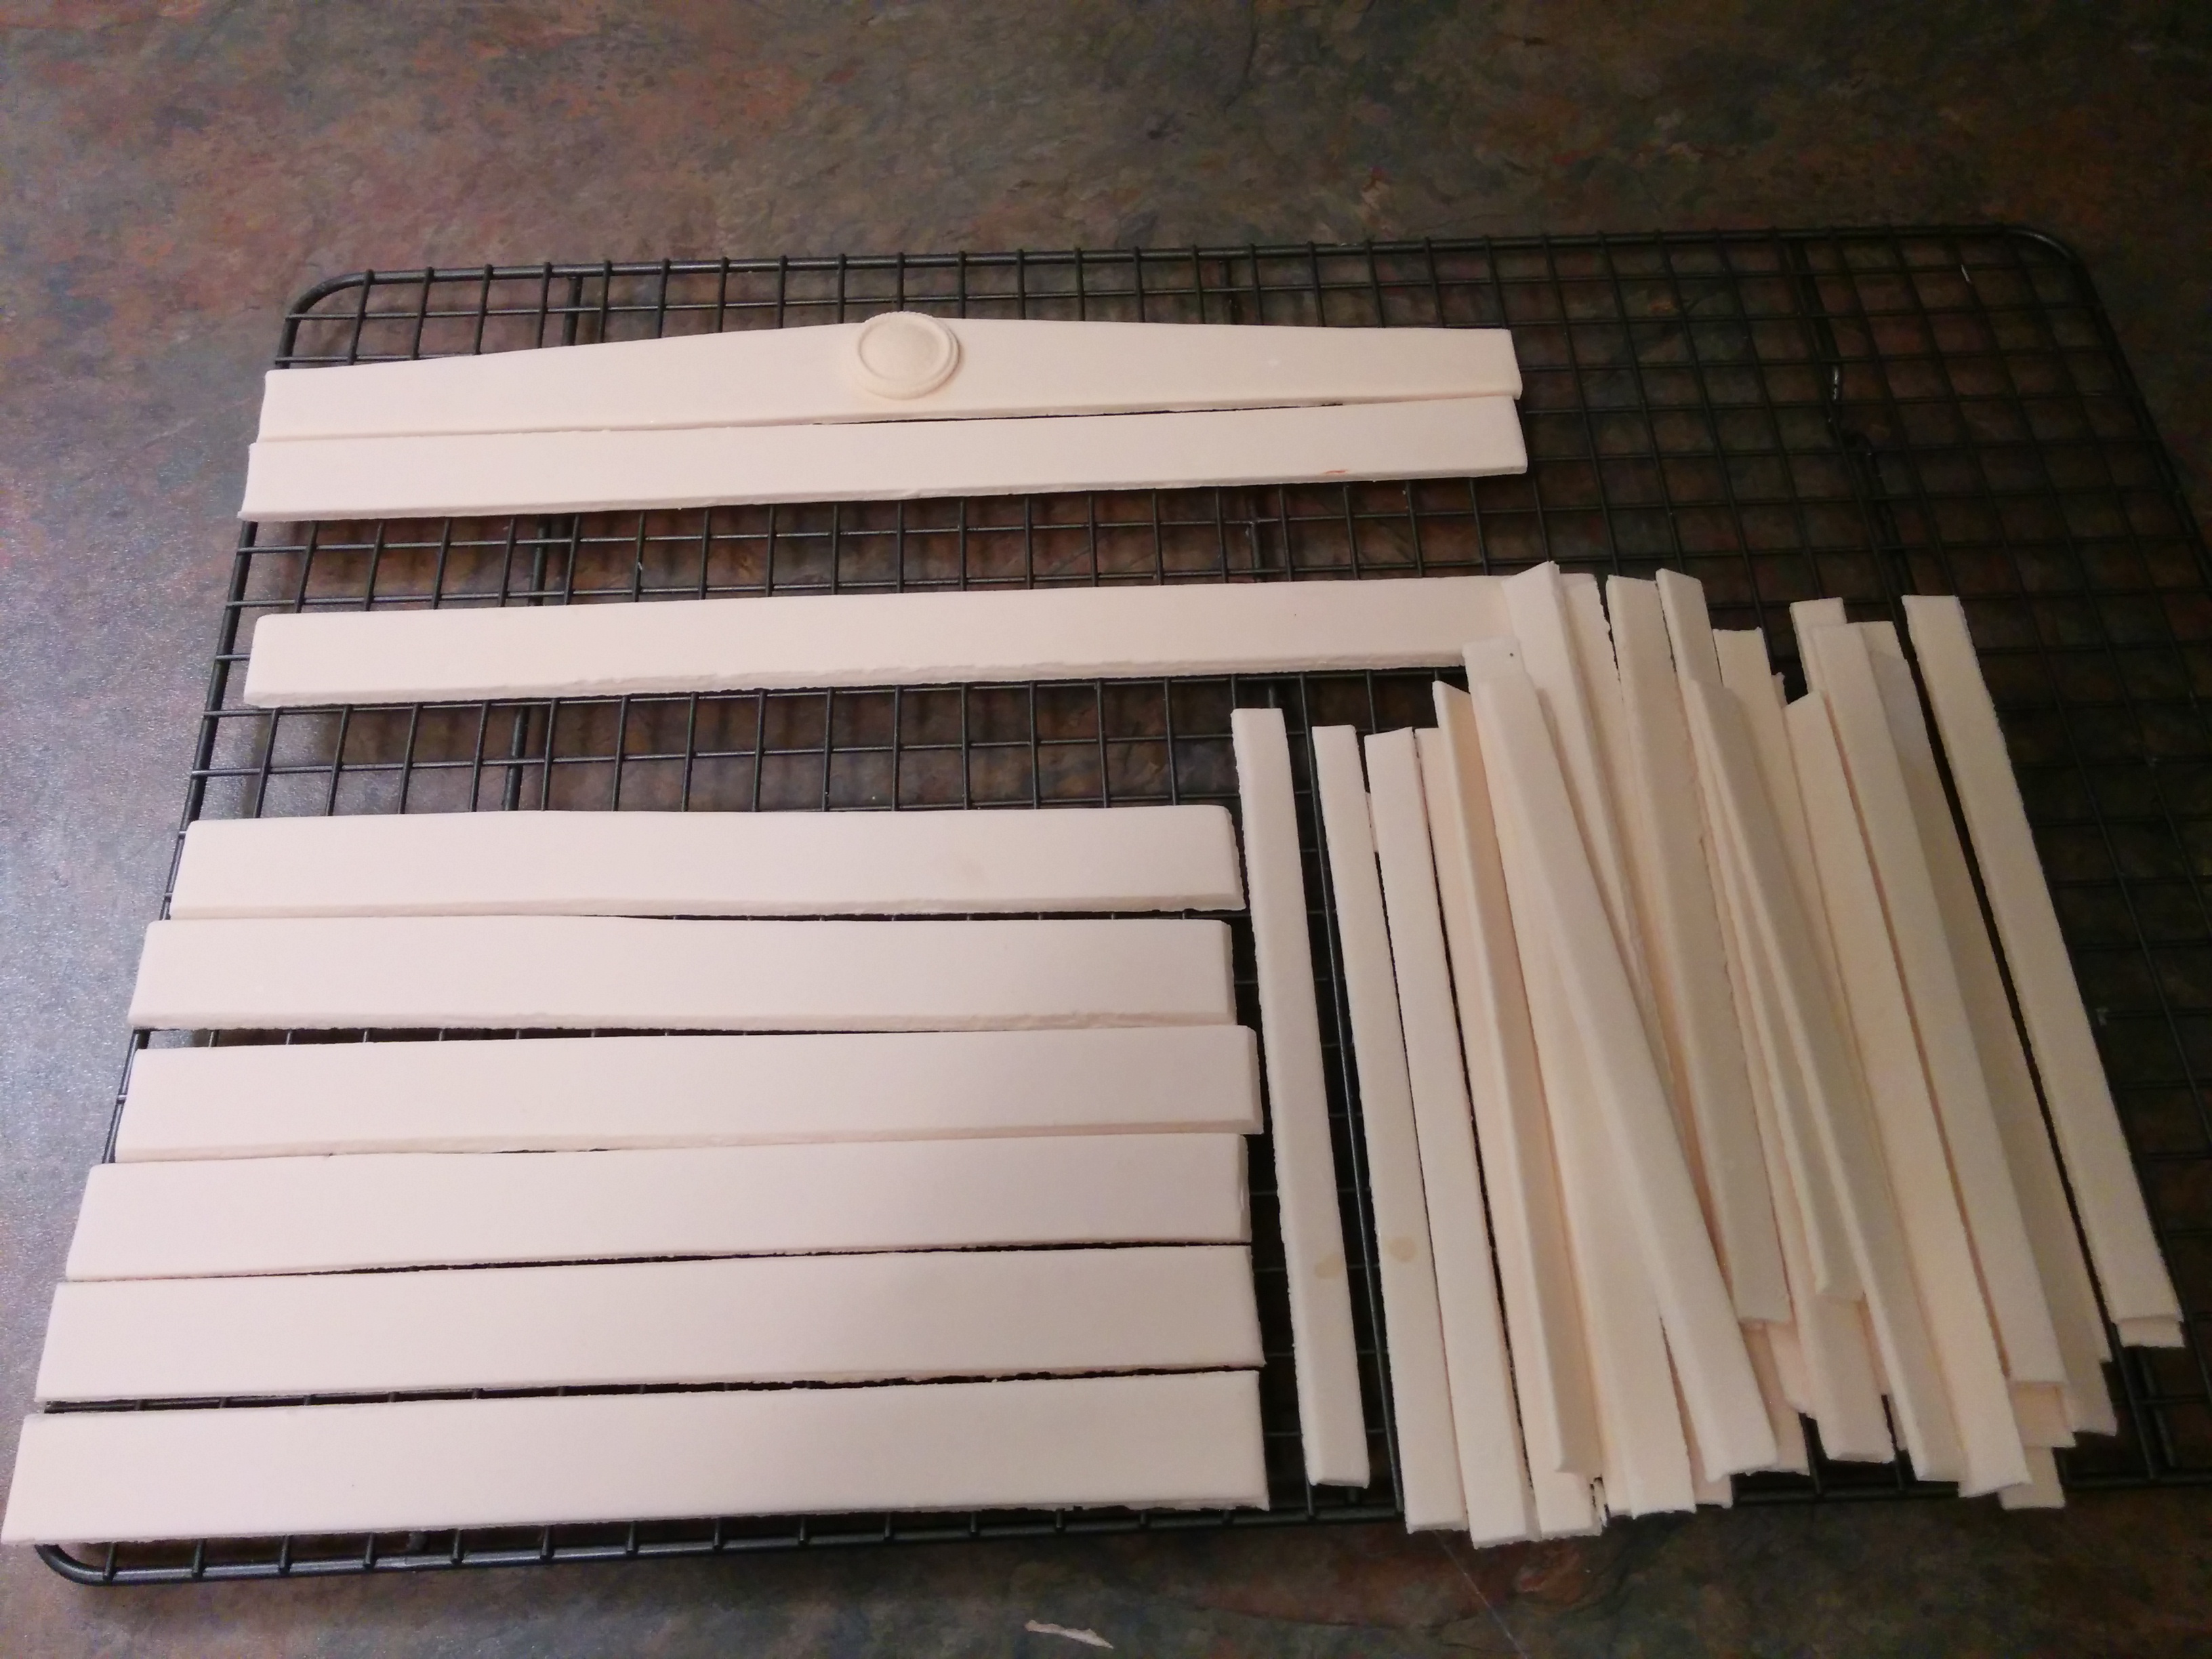
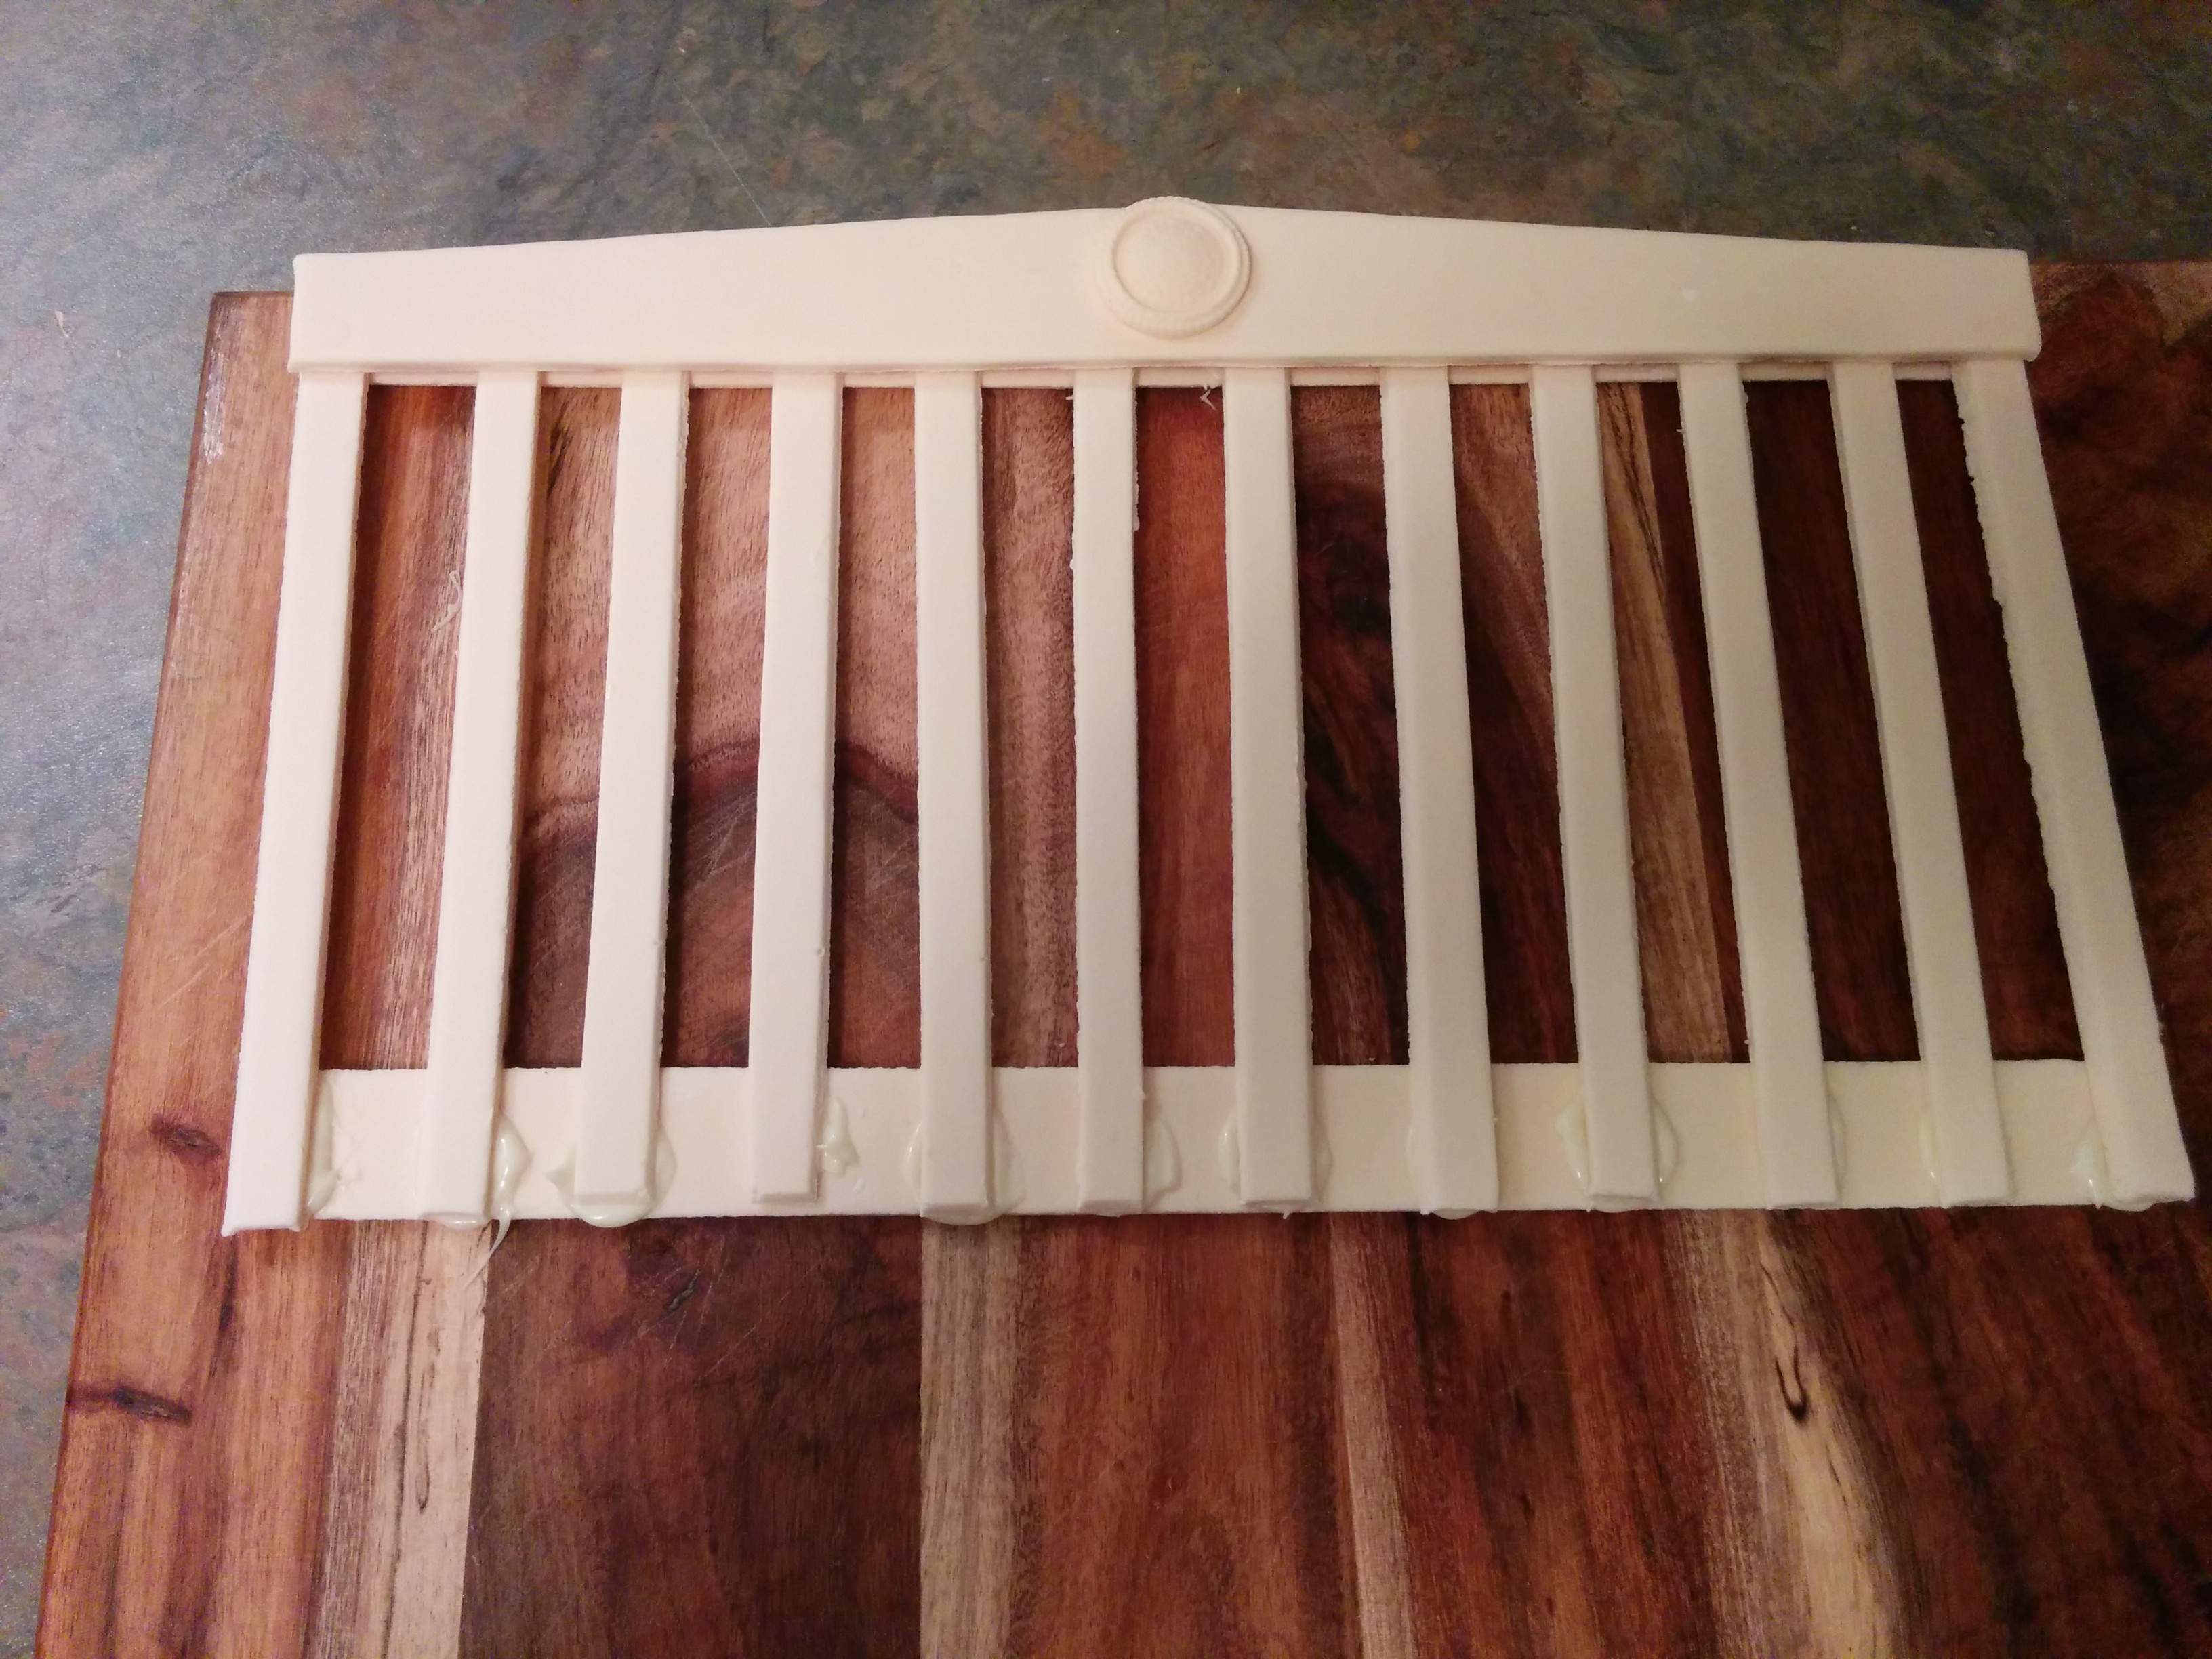
NOTE: For one of the 11 x .5 inch pieces, I cut it slanted at the top and placed a button in the middle. This will be the head piece.
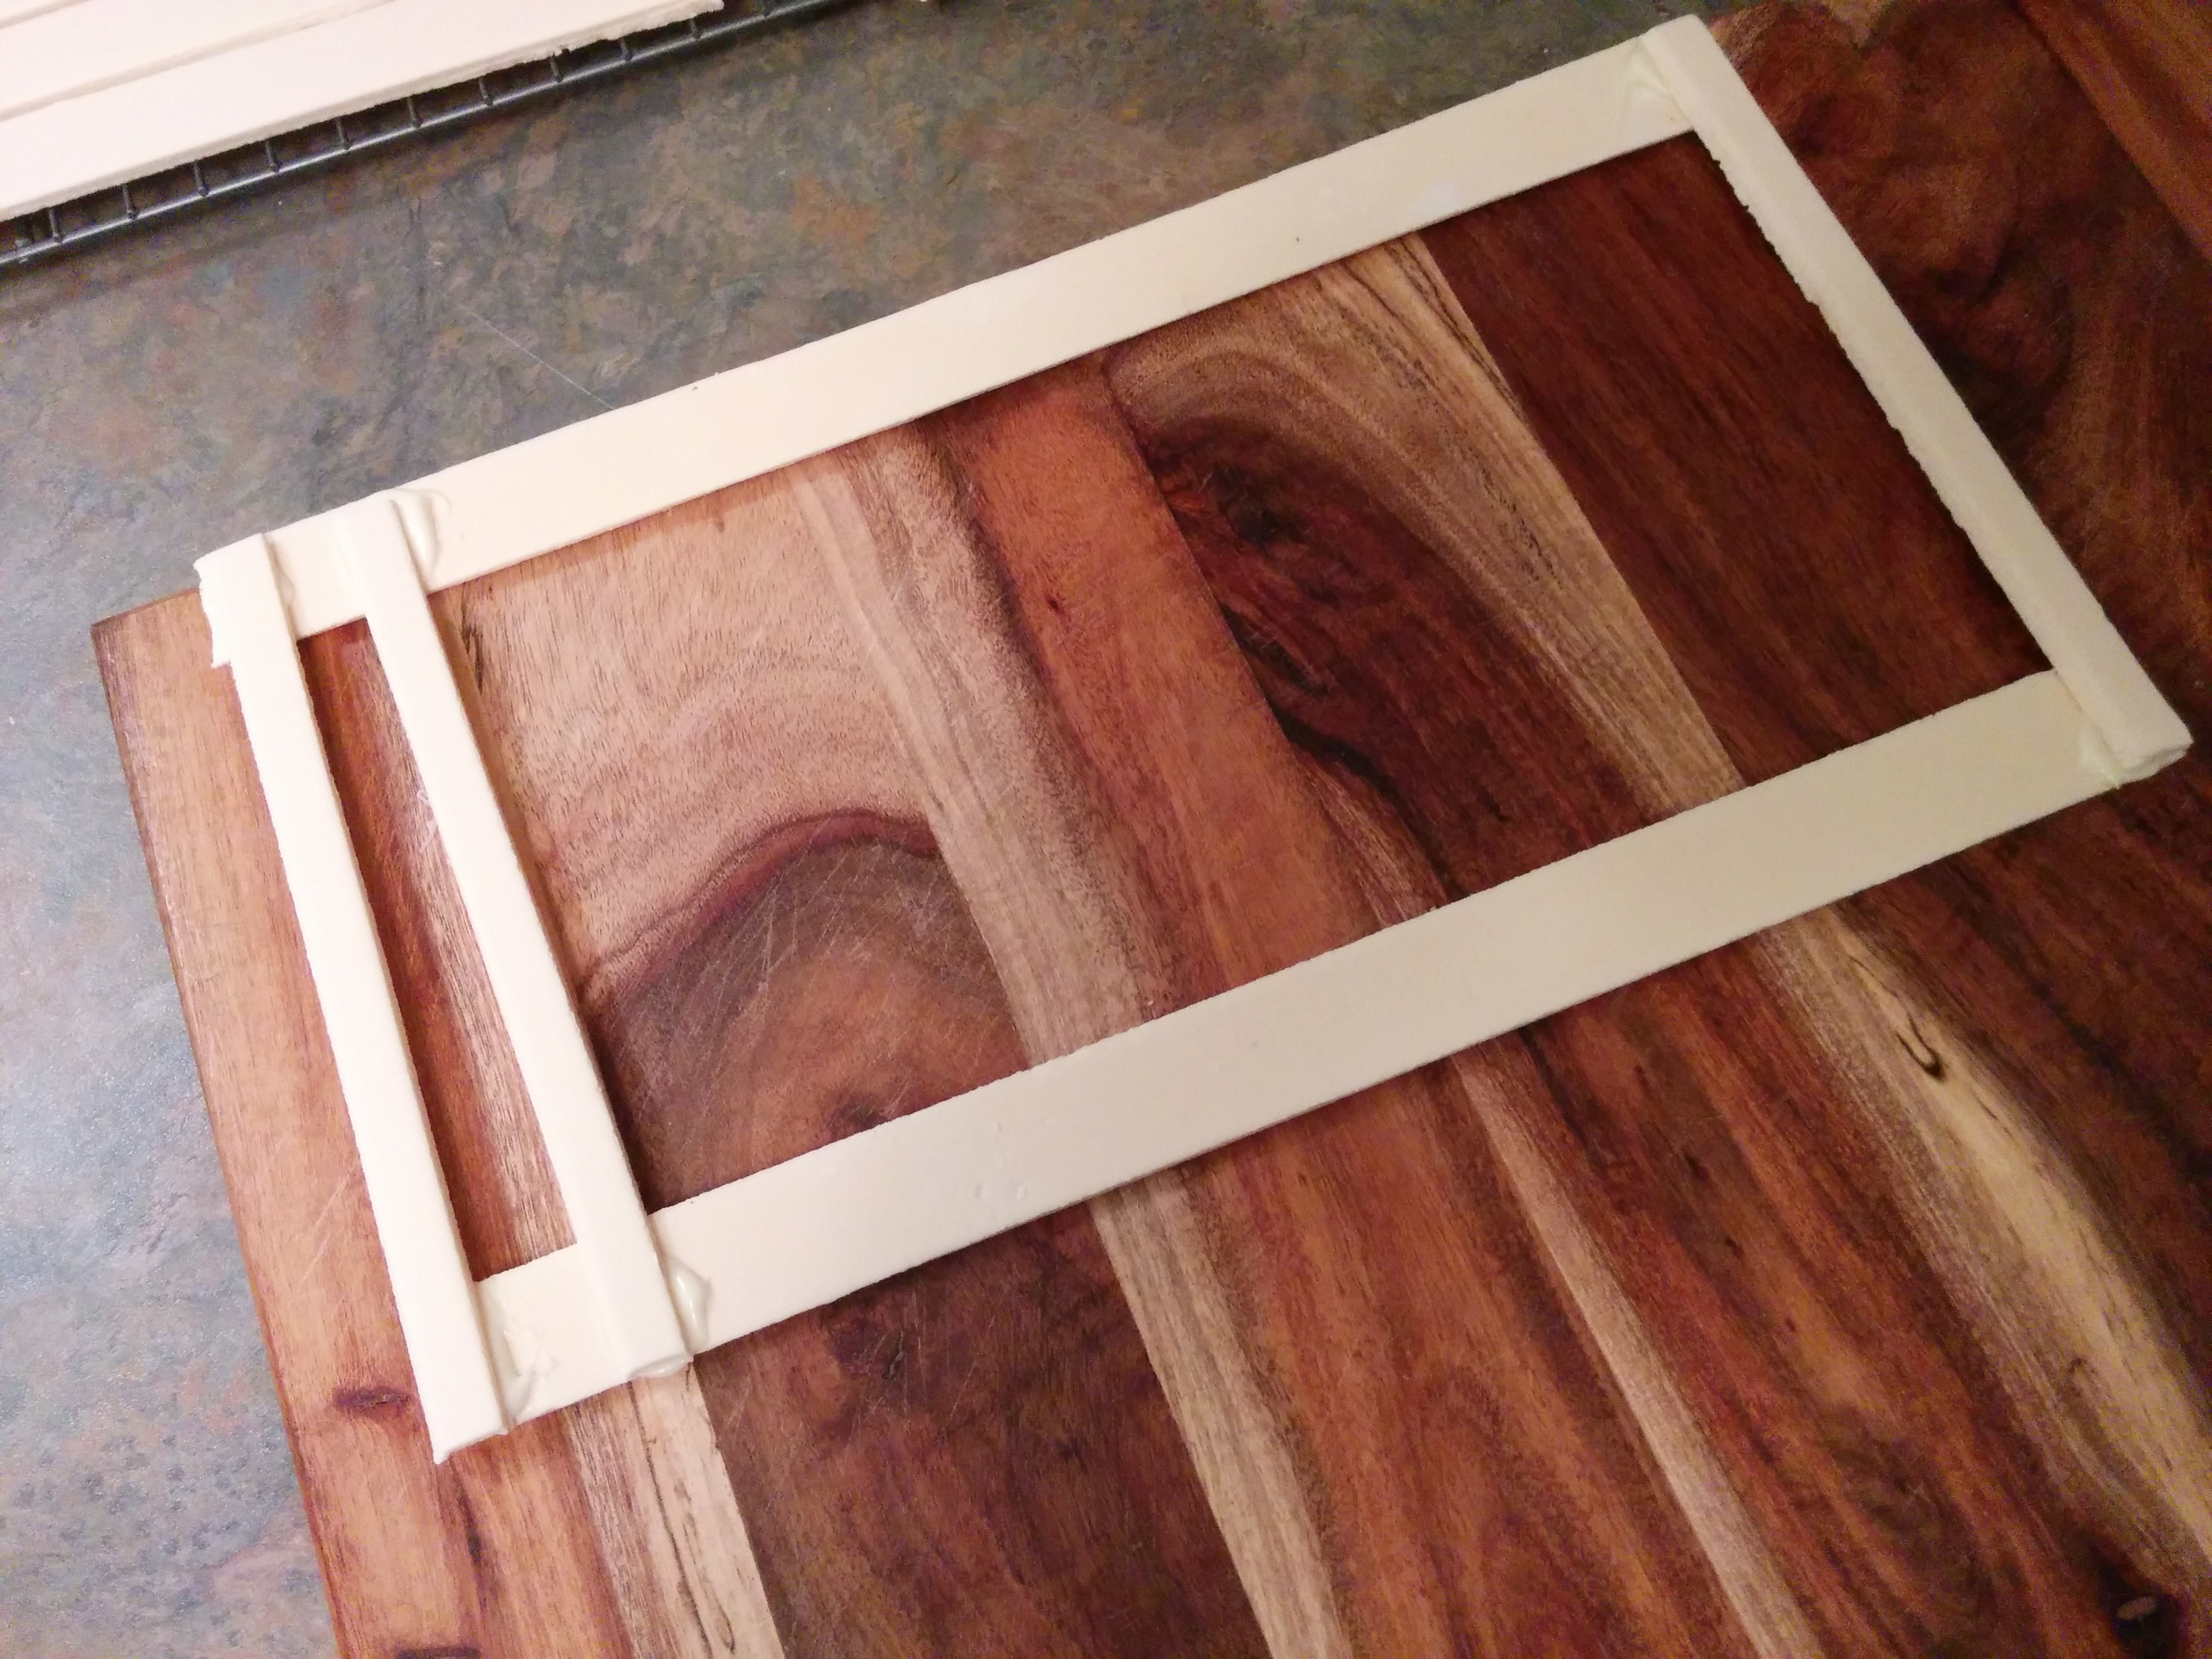
(5) After your pieces have dried out completely, they can be assembled into 1 head bead frame and 2 side frames.
(i) The head frame would contain 3 horizontal 11 x .5 inch pieces and 12 vertical 6 inch x 1 cm pieces.
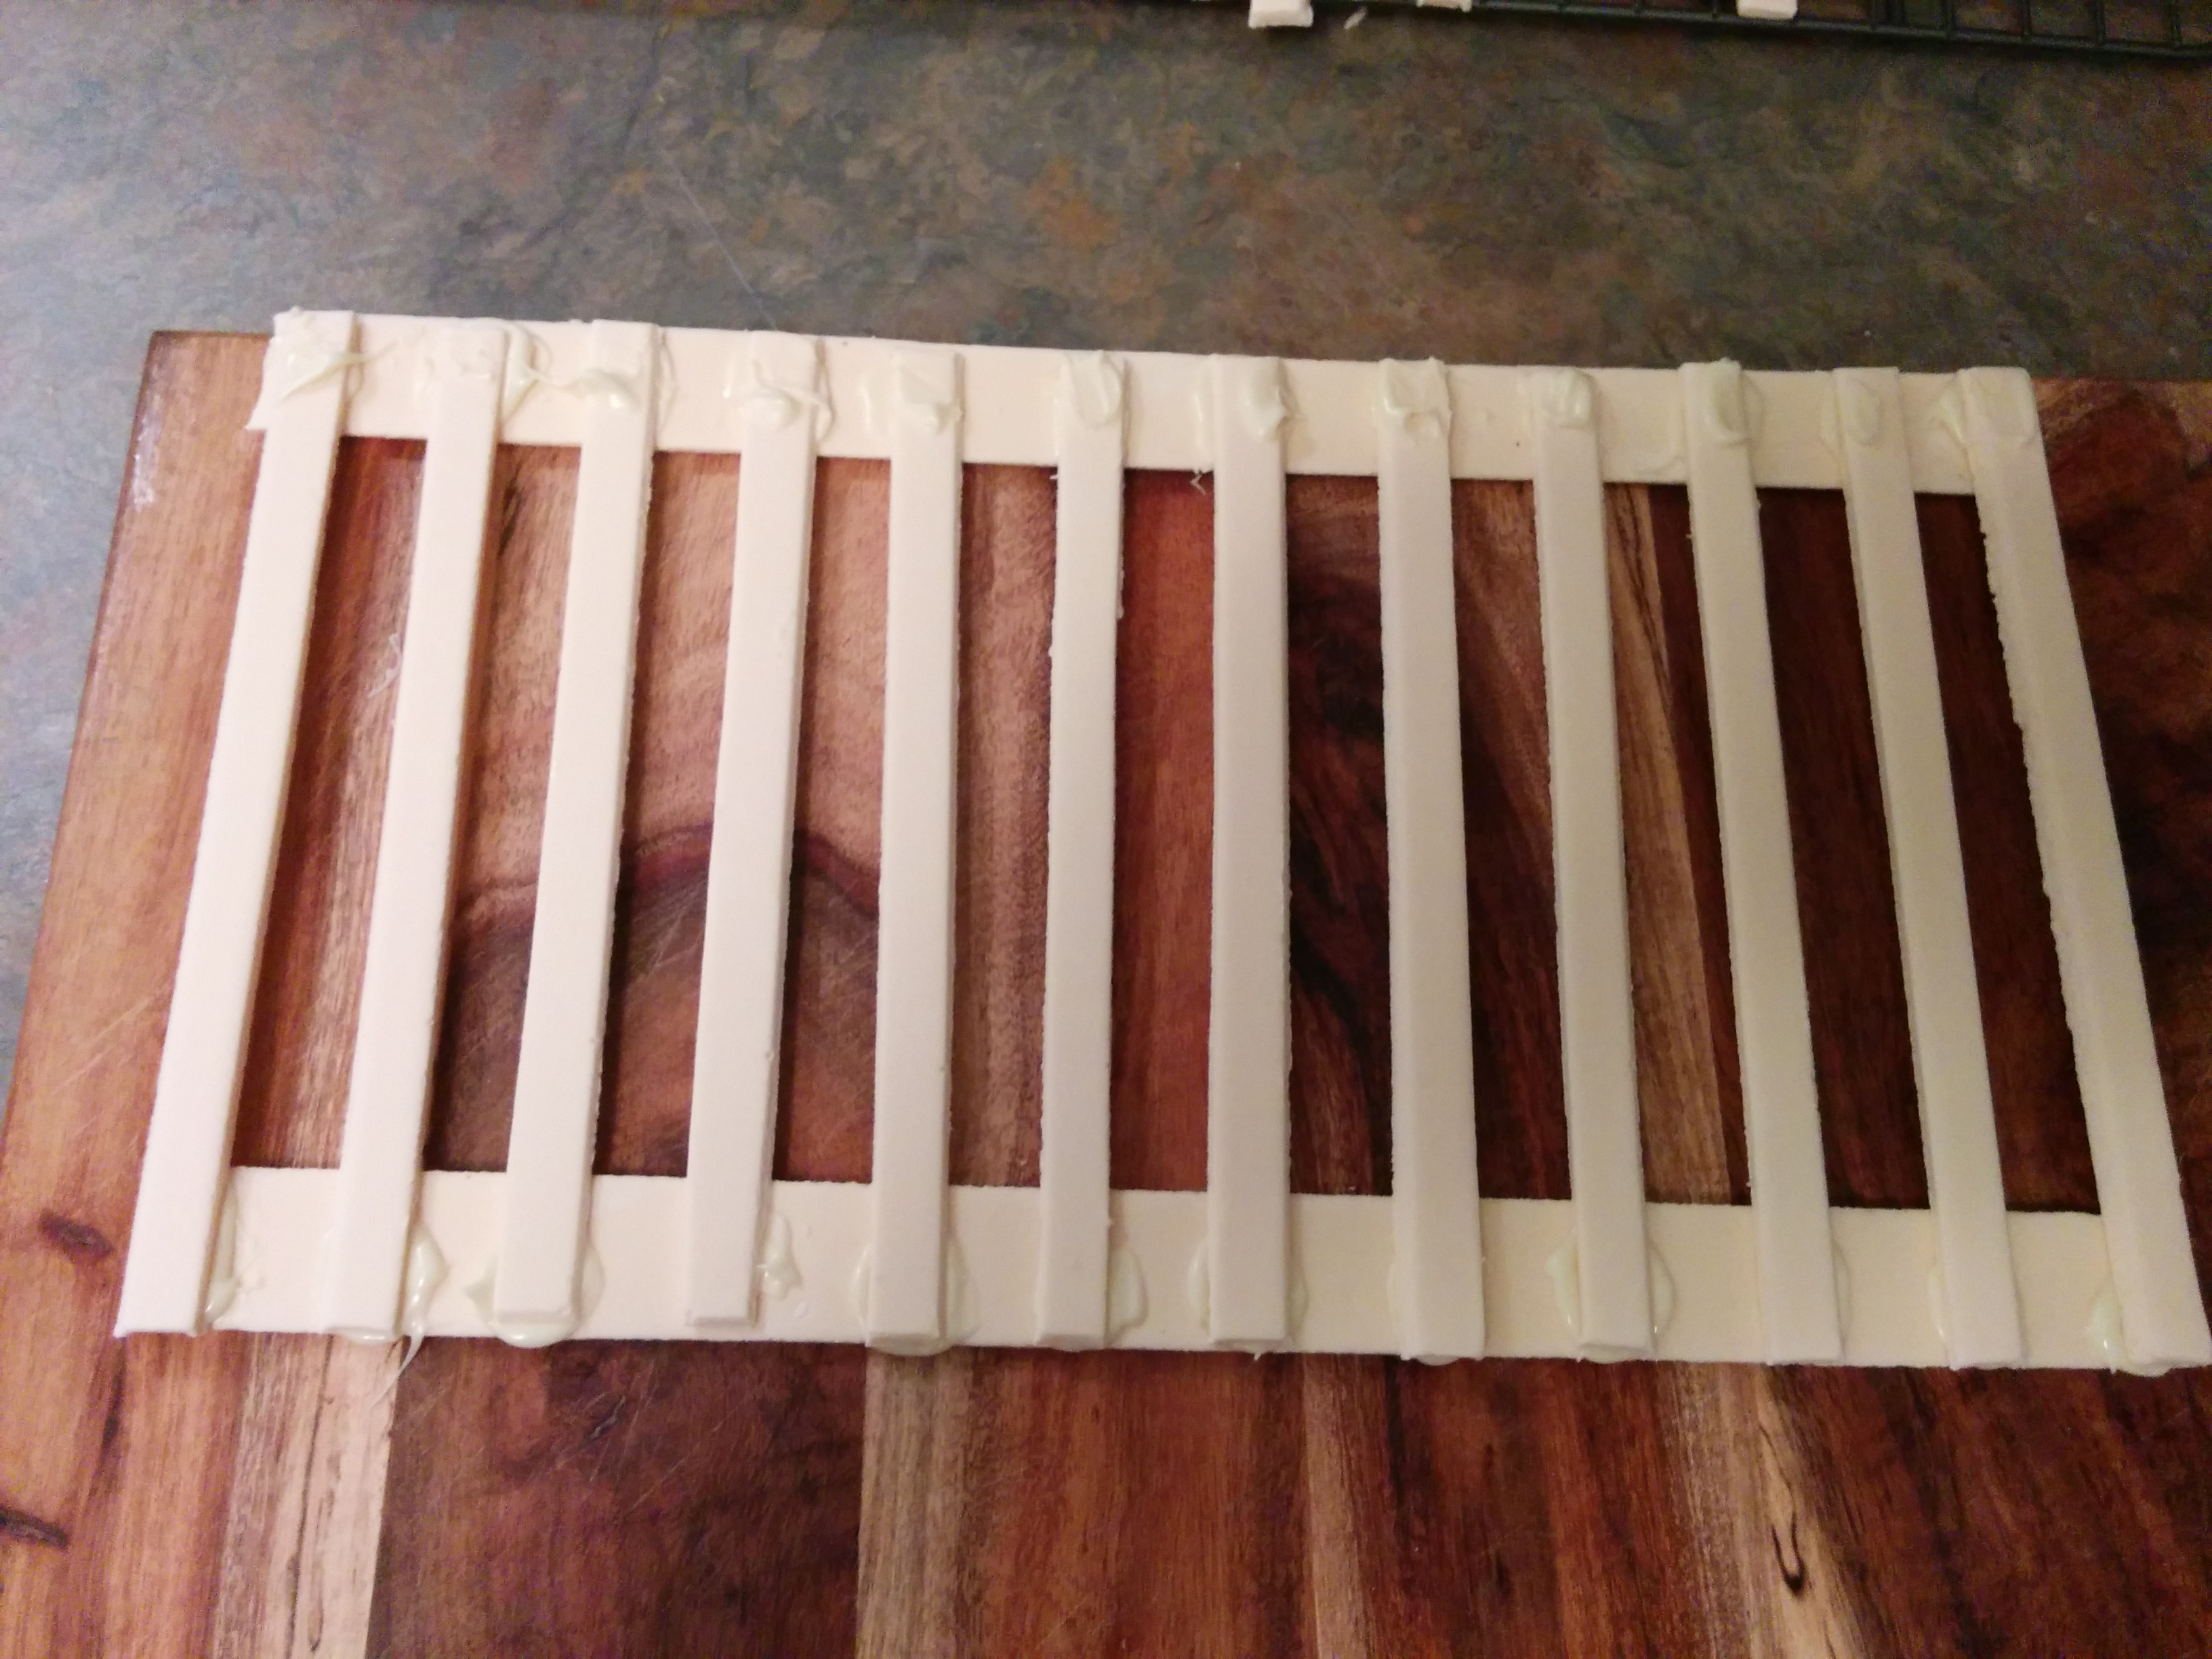
(ii) The side frames would contain 3 horizontal 8 x .5 inch pieces and 9 vertical 6 inch x 1 cm pieces each.
(6) The pieces should be glued together with white chocolate as I have found this to dry faster than other mediums. It also holds the frames in place. Thick royal icing can also be used.
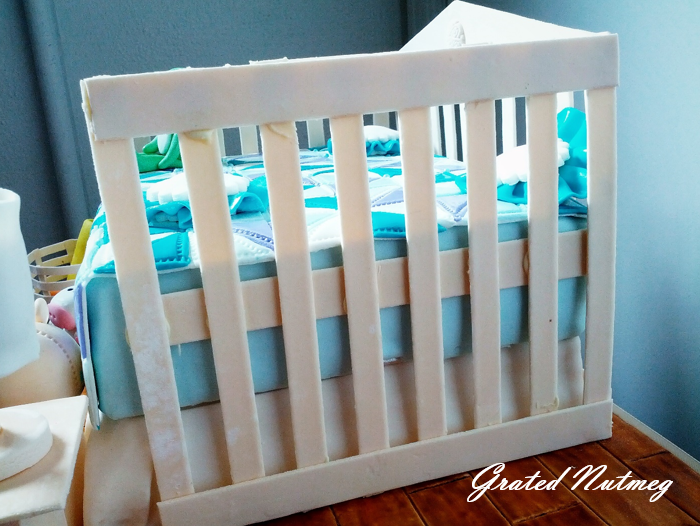
(7) To attach pieces together, lay down two horizontal frames parallel to each other and attach vertical frames on them. Try to space out the vertical frames in such a way that there are equal spaces between each frame. Finally attach the 3rd horizontal frame to the top. Make sure all the frames are straight or else they won’t look great on the cake. See pictures below for illustration.
(8) Allow frames to dry properly before moving them.
(9) To attach frames to cake, cover cake with fondant, spread some melted white chocolate on the bed frames and attach to sides of cakes.
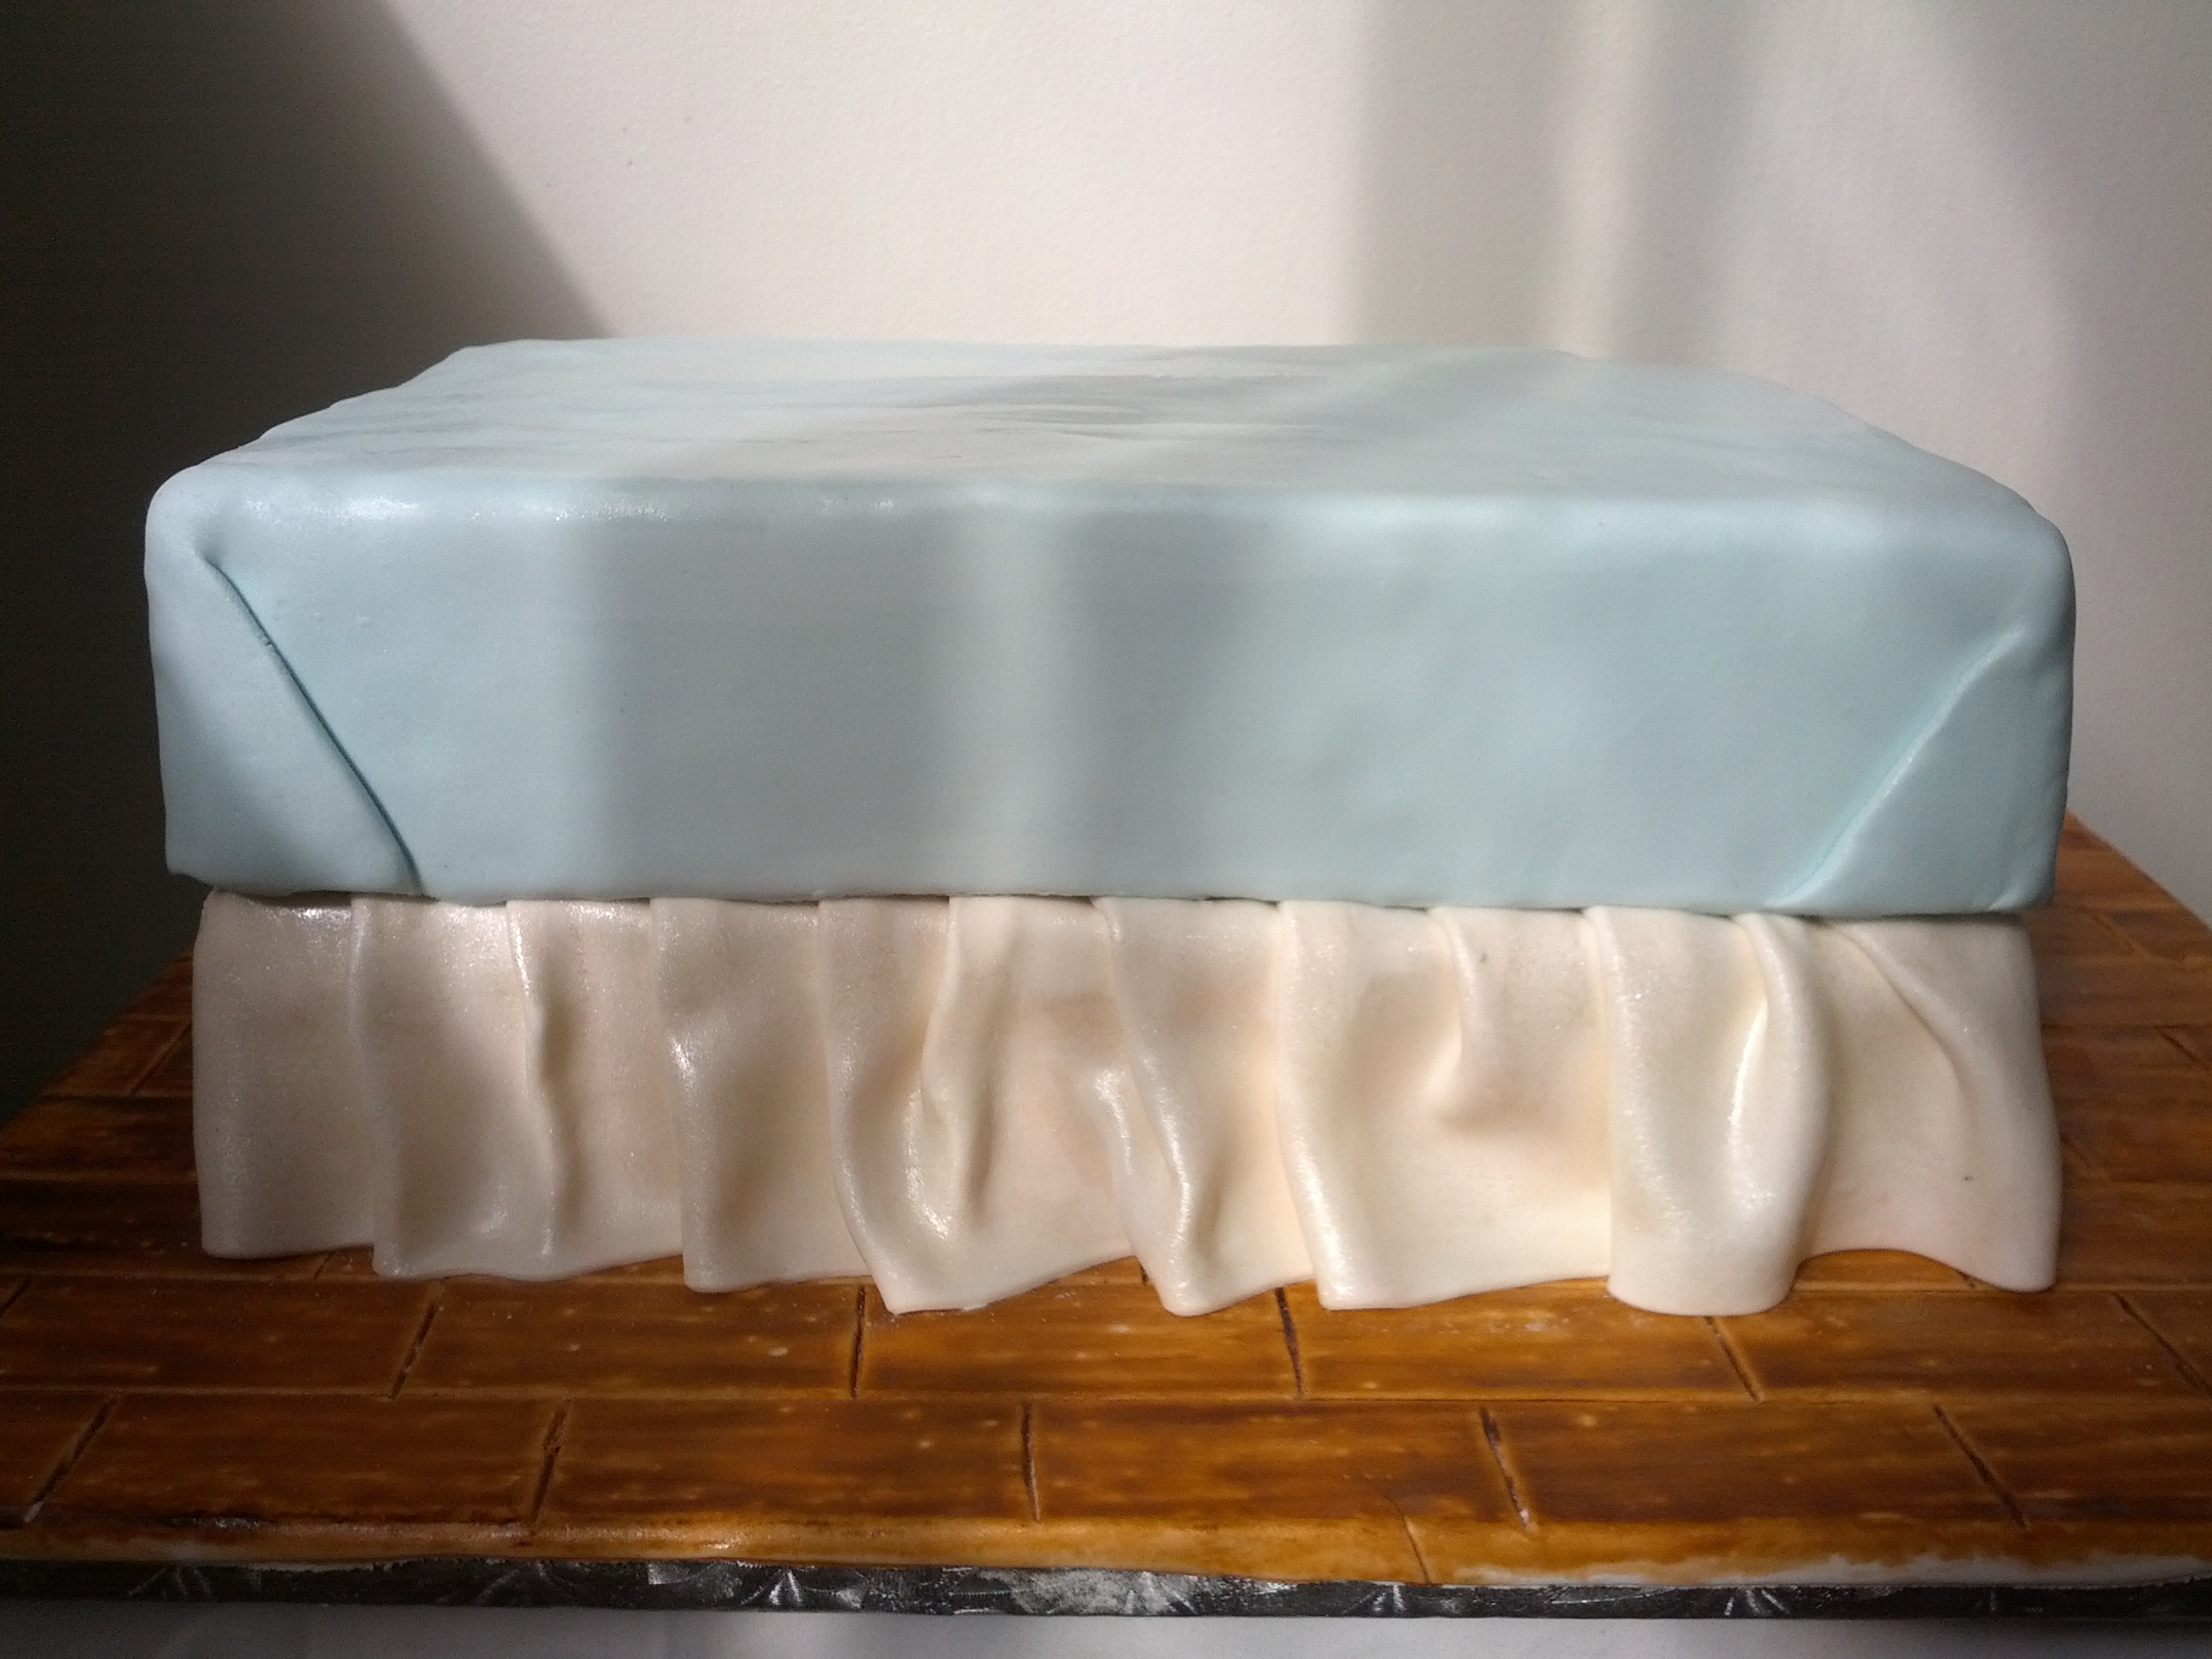
NOTE: You might be wondering why there are 2 horizontal pieces at the top and only 1 at the bottom of each frame. This is to ensure that there is a larger surface area for the frames to attach to the cake. If you placed a 4th horizontal piece at the bottom of the frames, that would be the only portion that will come in contact with the cake and that wont provide enough gluing space for the frames.
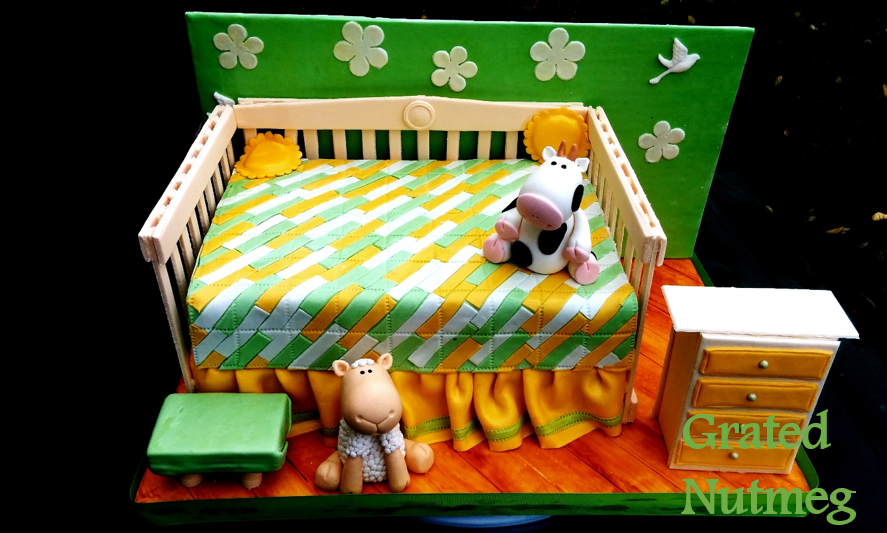
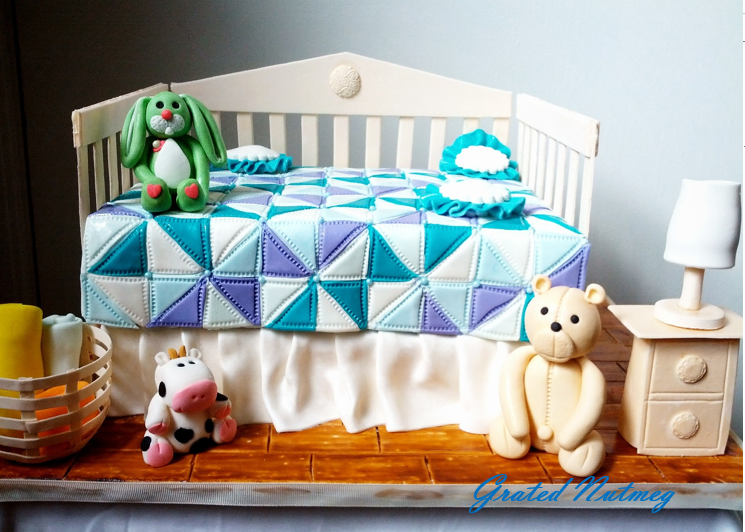
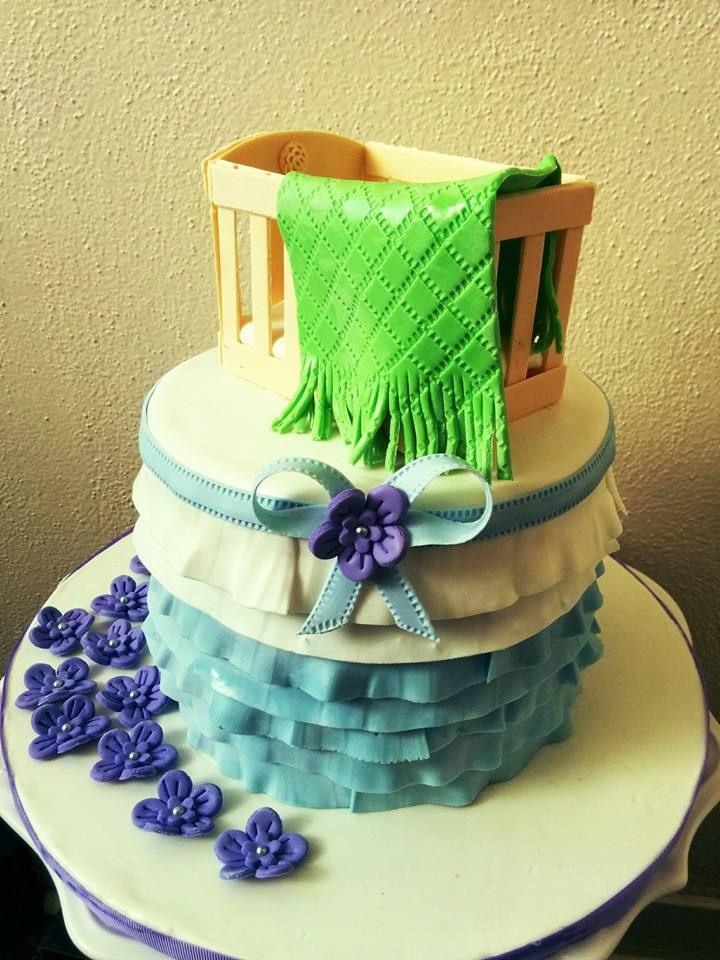
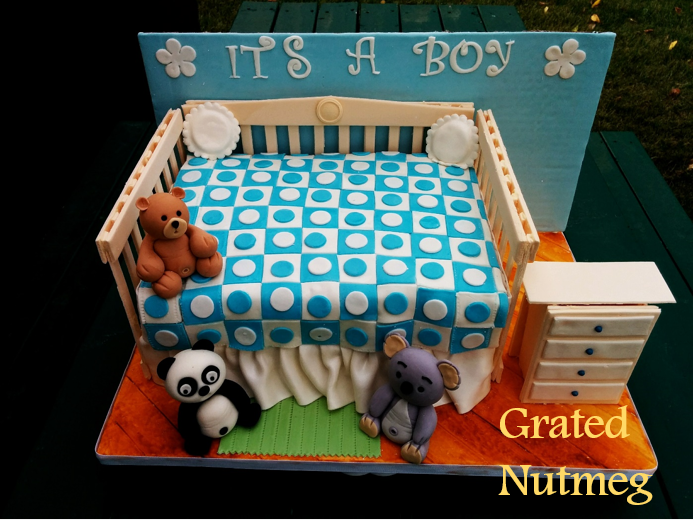
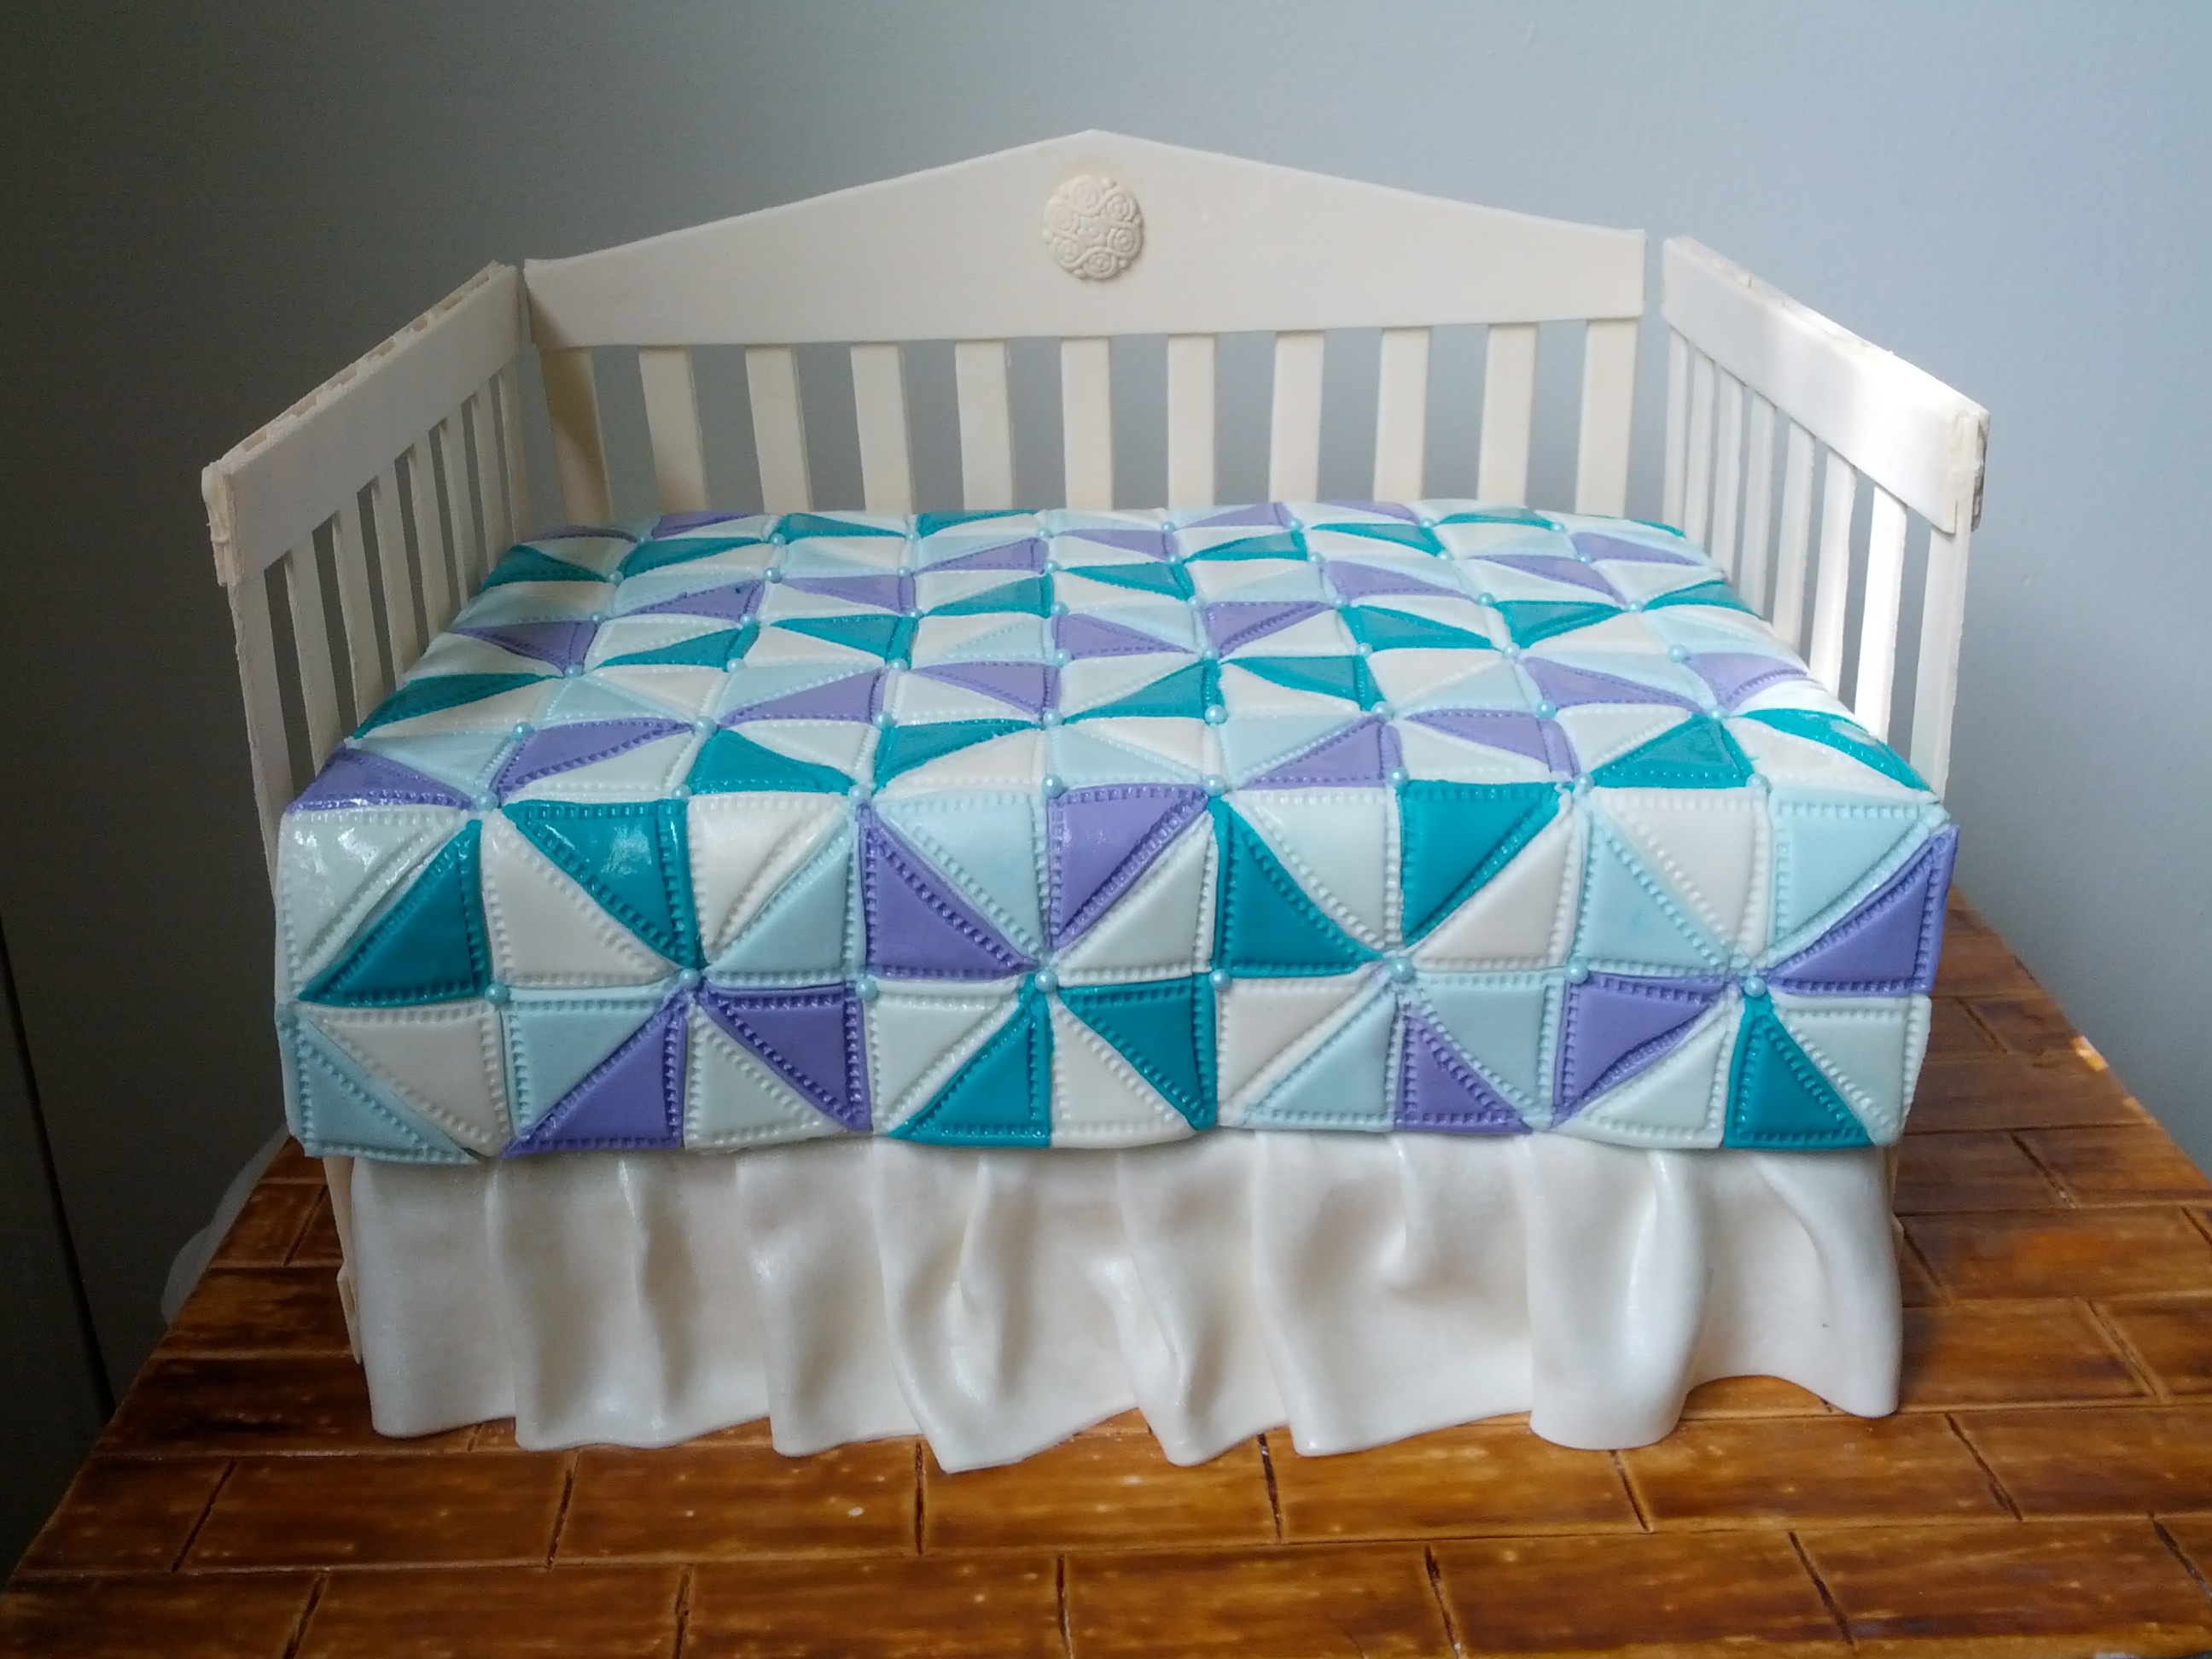
Yes, it is a lot of work and involves a lot of calculations. The end result however makes it all worth it. The dimensions can also be reduced to make smaller baby crib toppers like those in this baby shower cake.
Terry Adido is passionate about showing people how easy it is to recreate restaurant quality meals in the comfort of their kitchens. With a style of cooking he refers to as Afro-European Fusion, his meals are influenced greatly by French and Italian Cuisine with a West African twist. If you love good food, you are in for the ride of your life.
wonderful work i love it
Thanks Yemisi
Thanks
Lovely and will be great for a baby shower themed cake
Yes indeed.
Tanx so much for this, i will sure give it a try. Nice job
You are welcome Gloria. All the best.
How do I meet you?
If you have any question to ask, please feel free to ask it here. Thanks.
TNX ALOT
You are welcome.
You are a great teacher!!!! Sadly am not good in cake deco not creative at all. Wish I could be like you. Keep up with the good work.
Thanks.
One thing I like about you Terry, is that you love to share the knowledge you are endowed with.
More blessings dear.
Thanks Chinyere
Good Creativity in Cake designing
Thanks Buki.
Wowing me another time as usual
God bless u Terry
Thanks
Terry u re bless, pls continue u shall make head way
Thanks Abiola.
Lovely…..
Thanks for this I will try it.
You are welcome Lara.
Its nice,I will try it.
Awesome!
I ve gained immensely from ur tutorial and it has boost my biz. I soo much appreciate ur seflessness. U re blessed. Please is there a tutorial to how the bedsheets was created?
You are welcome Anthonia. No there isn’t.