
How to Make Horizontal Stripes on Fondant Cakes

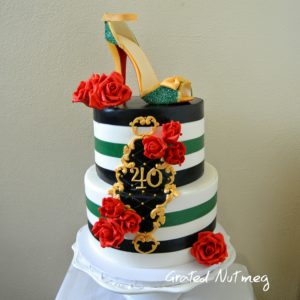
In this tutorial, I will be sharing my method of making horizontal fondant stripes on cakes. If you incorporate some of the tricks I share below into your next cake making project, you are sure to record more success. Although similar to making vertical stripes on cakes, horizontal stripes have their own challenges. It is important to ensure that the stripes are straight, even and properly laid. I will be using Black and White Striped Cakes and a Doc McStuffins Cake to illustrate the process.

I have a tutorial on how to make vertical stripes on cakes. That tutorial can be found here.

TOOLS:
(1) Rolling Pin
(2) Ruler
(3) Sharp Blade/X-Acto Knife
(4) Paint Brush
EDIBLE COMPONENTS:
(1) Fondant
(2) Water/Vodka
(3) Shortening
TUTORIAL:
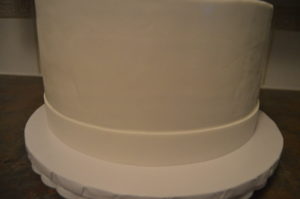
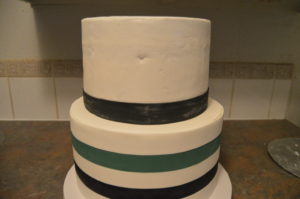
(1) First, cover your cake tiers with fondant. Keep in fridge to set.
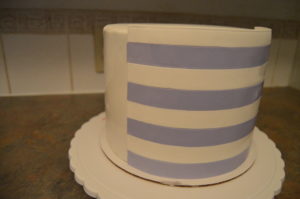
(2) Roll out the various colors of fondant you intend to use making sure they are all the same thickness. They should be long enough to wrap around the cake tier. Now, this is the most important part of this process, leave them to air dry for about an hour. Your goal here is for the fondant to be firm enough to handle without losing shape or stretching but soft enough to cut without breaking. It is important to monitor the drying process closely for unlike the case with vertical lines, you do not want your fondant to get too dry that it breaks during the wrapping process.
(3) When the fondant is dry enough to work with, use a ruler and x-acto knife to cut them into strips.
TIP: To get straight and sharp lines, grease the blade of your knife with shortening before each cut.
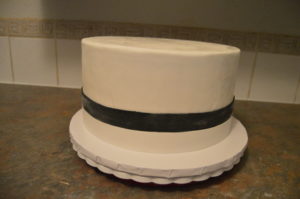
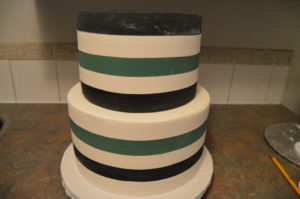
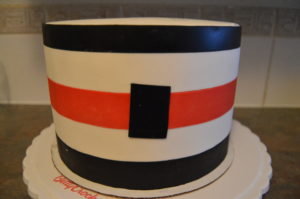
(4) Brush the sides of the cake with a bit of water (preferably vodka) and wrap your first stripe around the base of the cake tier. The seams should be at the back of the cake. Subsequent seems should meet at the same point. This first stripe will affect all the other stripes on the cake so it is very important that it is properly placed.
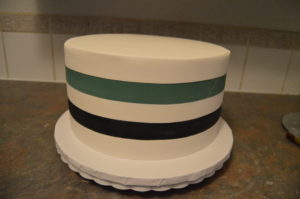
(5) Start sticking the other stripes to the cake making sure each stripe touches the stripe below it. You will notice that even though the cake tier has been draped with white fondant, I still wrapped it with white fondant stripes where needed. This is to provide accuracy and support for the other colored fondant stripes. There is a tendency for the lines to get crooked or tilted if gaps are left. You will also have an uneven cake surface with gaps.
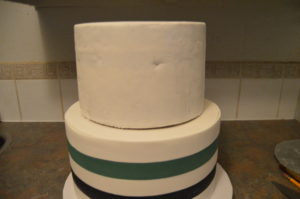
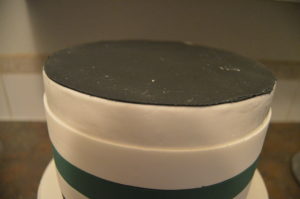
(6) When you are done with one tier, stack the second tier on it and continue the process. When you get to the top of any tier and you end up with a different color fondant than that which was used to draped the cake, cut out a circular fondant of the same color and cover the top of the cake before wrapping the cake with the final piece of fondant.
(7) If you are making a Doc McStuffins cake, you do not need to wrap around the entire tier with the fondant stripes. The cake can be wrapped half way around with the stripes. Another piece of white fondant is then wrapped around the back and sides of the cake to make the coat. The white fondant must be firm enough to bend for the coat collars without drooping or folding.
BONUS TIPS:
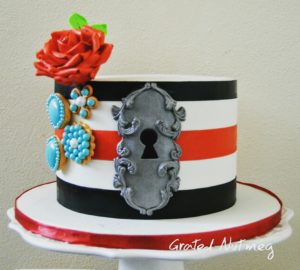
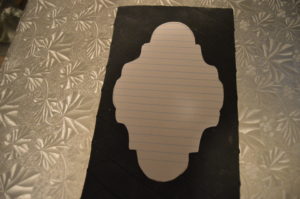
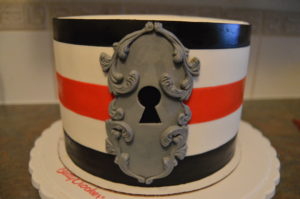
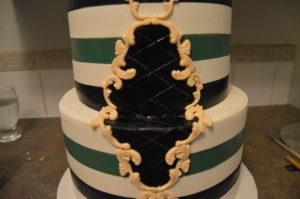
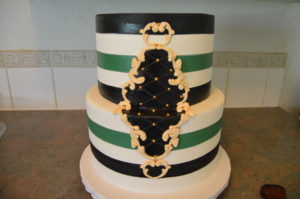
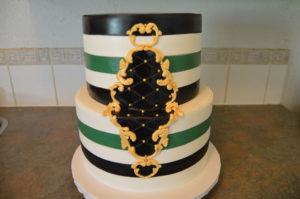
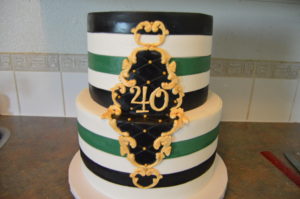
(1) If you intend to make the popular keyhole common with this black and white cake designs, draw or print out a picture of a door lock and use it as template to cut your fondant. Also cut out a key hole in the middle using a small round cutter and a triangular cutter (I actually used my ruler and blade to make the triangular part of the cut).
(2) Cut a small piece of fondant enough to cover the keyhole and stick to the cake. Stick the door lock pattern on the cake and stick scrolls around the pattern. I used a Wilton silicon floral mold for the scrolls. In the cake below, the door look and scrolls were brushed with a metallic silver color dust mixed with vodka.

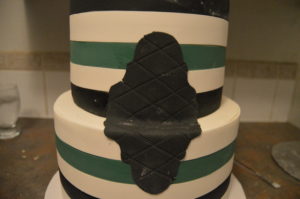
(3) This design can also be made without a keyhole. In the cake below, a quilt pattern was made on the door lock and the scrolls were painted silver.
RELEVANT TUTORIALS:
(1) Fondant Stiletto Tutorial. Link here.

(2) Fondant Rose Tutorial. Link here.

(3) Fondant Stethoscope Tutorial. Link here.

Terry Adido is passionate about showing people how easy it is to recreate restaurant quality meals in the comfort of their kitchens. With a style of cooking he refers to as Afro-European Fusion, his meals are influenced greatly by French and Italian Cuisine with a West African twist. If you love good food, you are in for the ride of your life.
A million kisses from Nigeria Terry, thank you!
Thanks Bunmi.
Thank you bro, may God reward you greatly
Thanks Rukky.
Good one Super Boss. Thanks for this tutorial.
You are welcome Mary.
Thanks a lot u are the boss
You are welcome Keji.
This tutorial is of good help to me. Ive always thought of how well i can do the horizontal stripes perfectly.Thank you Terry.
I am glad you find it helpful Blessing.
Hello Terry your Tutorials are always easy to understand. With you and your tutorials I need not pay to attend a practical class anyday. Thanks a Million. #Eyes Opener #Eyes Sharpener
My pleasure Justina.
Awesome! Thanks Terry
You are welcome Susy
You are always on point Terry. Love ur works. Bless u.
Thanks boss.
You are a blessing Terry.Plenty kisses from Nigeria.
Thanks Emediong.
Your cakes are really neat.. . Thanks for sharing
Thanks Ade. You are welcome.
Thanks Terry! God will take you higher in your career.
Thanks.
Thank you so much Terry. In the Vertial stripes tutorial, please how did you come about the Cake board panels?
See here.
Good job Terry. Please, how do you work the stripes such that gaps are not obvious between the stripes?
You just lay them very close to each other.