
How to Make Extended Swirl Design on Cakes.

In this tutorial, I will be showing you how I make extended swirl designs on cakes using fondant. This technique is a cross between draping and ruffling. It starts out with plain strips of fondant which end in a swirl on one side of the cake.
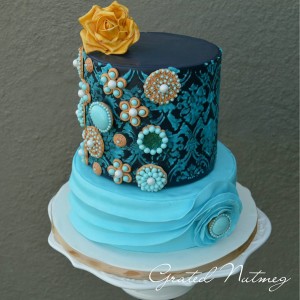
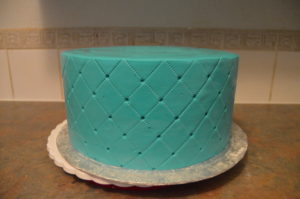
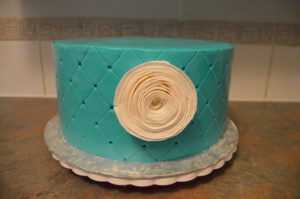
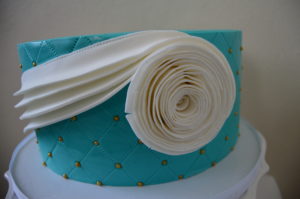
There are several variations of this design. The jewelry encrusted cake below shows one such variation. If you click on this link, it will take you to the tutorial on how this cake was made. That tutorial includes notes on how the extended swirl design was achieved in this cake.
THE PROCESS:
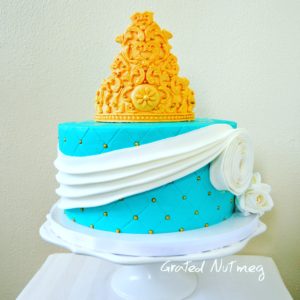
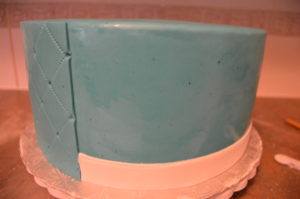
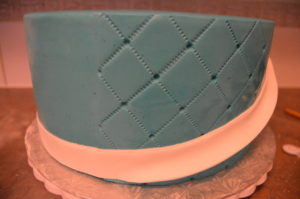
(1) The first thing you need to do is drape your cake tier. The tier below was draped and then covered with the diamond pattern. A tutorial on how to make diamond patterns (quilts) on cakes can be found here.
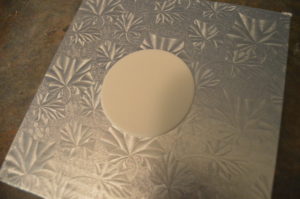
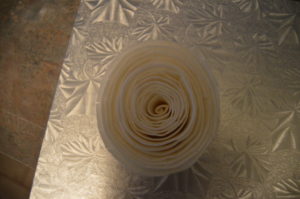
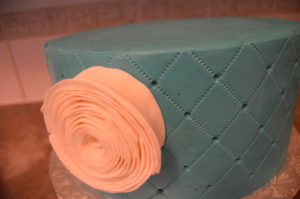
(2) Next, make the swirl ruffle at the end of the design. To do this, cut out a round piece of fondant using a round cutter. Cut long strips of fondant and ruffle one end of the strips. Brush the circle with a bit of water and make the ruffle by sticking the fondant strips in a spiral, starting from the middle of the circle and working your way out to the edge. Try to spread out the ruffles as best as you can. While you can use this ruffle immediately, I will suggest allowing it to dry for some hours before sticking it on the cake. I allowed mine dry overnight before transferring it to the cake. This way, there was no damage, flattening or denting of the ruffles.
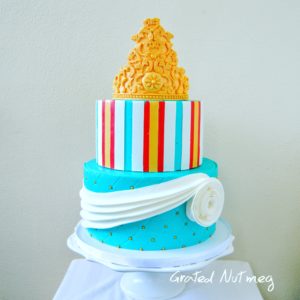
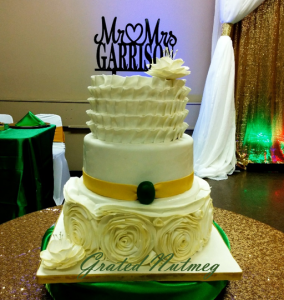
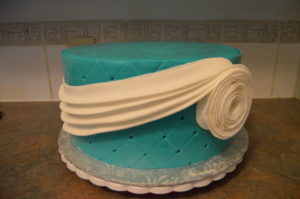
QUICK NOTE: The bottom tier of the cake below was made using a similar method as above.
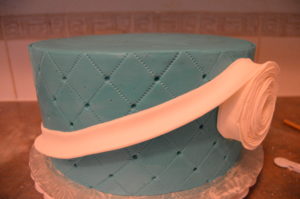
(3) Next, stick the ruffle to the side of the cake. If the ruffle is not large enough to cover the entire height of the cake, stick it towards the top of the cake. The drapes are going to start at the bottom of the cake and make their way to the top of the cake.
(4) Next, roll out white fondant and cut out strips about an inch wide. The ends of these strips need not be ruffled.
(5) Brush the side of your cake with a bit of water. Starting from a marked spot at the back of the cake, stick your first strip of fondant at the base of the cake. It should lie flat on the cake until it gets to the front of the cake. At the front of the cake, begin to elevate the strip towards the top of the ruffle and wrap the end of the strip around the ruffle. You might need to run your fingers underneath the strip a few times for it to stay upright and not collapse on the cake.
(6) Continue the same process with all the other strips of fondant. Start at the same location at the back of the cake and work your way to the ruffle on the side of the cake.

(7) Leave the strips to dry before continuing with your cake design.
That’s all there is to it. A complete tutorial on how the entire cake was made can be found here. Happy caking!
Terry Adido is passionate about showing people how easy it is to recreate restaurant quality meals in the comfort of their kitchens. With a style of cooking he refers to as Afro-European Fusion, his meals are influenced greatly by French and Italian Cuisine with a West African twist. If you love good food, you are in for the ride of your life.
Your tutorials are always easy to follow. Tanks for sharing.
You are welcome Chinyere.
Pls y nt make video tutorials too
I don’t make videos.
Wow!your ability to share your ideas is what WOWs me.You are a Genius.thanks for sharing.
Thanks Betty
easy to comprehend…. thanks a lot
My pleasure.
I am trying my hands on this right now and I had to stop to drop This… Terry, may God bless and keep you for us. I will post the picture here as soon as am done.you rock!
🙂 Thanks Abiola. Do send me a pic on my facebook page.
Thanks again Terry!i just sent it.
Awesome. I will look out for it.
Thank you Terry for yet another simplified tutorial.I appreciate you so much.
You are welcome.
Thanks so much for sharing so generously. Look forward to meeting you at the Uncut session next Monday
You are welcome Dorothy.